It’s hard to listen to an out-of-tune piano.
If you’re a piano owner, you’ve heard the sound countless times. A beautiful instrument that doesn’t sound so beautiful anymore. Once it’s tuned, it can be enjoyable to listen to rather than a burden.
“But how should I tune it?” “Should I hire a piano tuner?”
Table of Contents
- Why It’s Important to Tune Your Piano
- Is It Possible To Tune a Piano By Yourself?
- How To Tune a Piano (Step by Step)
- The Tuning Process
- How To Pitch Raise a Piano
- Stretch Tuning
- How Much Does it Cost To Tune a Piano?
- Why it Might Be Worth it To Tune Your Own Piano
- Circumstances Where Hiring a Piano Tuner Might Be Better
Keep reading, and this article will answer those questions and be a step-by-step guide on how to tune a piano.
Why It’s Important to Tune Your Piano

A piano is a very complex machine. The average piano has over 10,000 parts and 220 strings. All of these strings have to be tuned individually to create a good sound. It’s never satisfying to have an expensive instrument lying around in your house that doesn’t sound good.
If a piano sits for a long time without being tuned, it’ll be harder to get it back into shape. For example, your piano might need a pitch raise if it hasn’t been adjusted in 5-10 years. A pitch raise is necessary if each of the strings is at least a half-step flat. You can’t effectively tune unless the pitches are relatively close. By the time you get through all the strings, the strings you started with will already be out of tune.
In reality, it costs less to tune your piano than it does to get it tuned. But, this cost efficiency isn’t initial. The saved money comes into play when you don’t have to hire piano tuners for years on end. New pianos should be tuned around 4 times in the first year. Why, you ask? It’s because new strings go out of tune faster. If you maintain it really well in the first year, it will last a lot longer.
Another reason to regularly tune a piano is to preserve your ears. If you regularly play on an out-of-tune piano, your ears will get used to these pitches. As a result, correct pitches might sound out-of-tune to you. This confusion isn’t ideal for anyone wanting to become a better musician.
In-tune pianos are much more enjoyable to play. Even if you’re used to it being out-of-tune, you won’t get the same satisfaction. You won’t know if it’s you or the piano making a mistake. People who regularly tune their pianos are more likely to stick with the instrument.
Is It Possible To Tune a Piano By Yourself?

There are all kinds of do-it-yourself projects you can tackle. On the difficulty spectrum, tuning your piano is pretty high. It’s not quite as simple as using a tuning app on your phone or twisting a few knobs. There are several specific processes you have to follow to tune a piano effectively. With that said, yes, it’s possible to do it yourself. If you work hard and learn the steps, you may not need to hire a piano tuner again.
DIY Piano Tuning
How To Tune a Piano (Step by Step)
There are several pieces of equipment you need to acquire before you start tuning. These tools aren’t the types of things you’ll find at the average hardware store. Some of the best places to get them are online specialty shops and Amazon.
Here’s a list of things you might need.
- Tuning Hammer
- Chromatic Tuner
- Mutes
- Feather duster
- Rags
Tuning Hammer
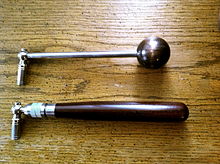
The tuning hammer is probably the most important thing to have when it comes to tuning a piano. In terms of this tool, you get what you pay for. You can find both cheap tuning hammers as well as expensive ones. If you look for the cheapest one possible, your tuning experience might not be as successful as it could be. A cheaper hammer can be flimsy and difficult to work with.
The tuning hammer is probably the most important thing to have when it comes to tuning a piano. In terms of this tool, you get what you pay for. You can find both cheap tuning hammers as well as expensive ones. If you look for the cheapest one possible, your tuning experience might not be as successful as it could be. A cheaper hammer can be flimsy and difficult to work with.
For example, most of the high-quality tuning hammers are in 3 parts: the head, lever, and tip. Many cheap hammers might only have 1 or 2 of these parts, which makes them less effective. As a rule of thumb, invest in a hammer that’s at least $50. A quality hammer will do the job much more efficiently.
You’ll find that tuning hammers have different tip sizes. The larger tips go around more of the pin, while the smaller ones work higher up on the pin. Get the #2-sized tip if you’re unsure of the size you need. This size is universal and works for most pianos.
One of the best tuning hammer materials is aluminum. Compared to other materials, aluminum is low-priced, robust, and easy-to-handle. Size is important to consider, as well. The longer the handle, the more leverage you have. You can make more precise adjustments with a long hammer than you can with a short one. Tuning hammers are usually between 10 and 14 inches in length. So, if you want lots of control, get the longest hammer possible. However, there’s one downside to longer levers. They tend to be bendy and don’t always stay in their solid form. If you’re not careful, the added flexibility can lead to making a mistake.
Chromatic Tuner
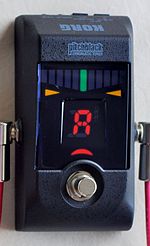
Chromatic tuners are the best things you can use to tune a piano. An app-store or guitar tuner won’t get the job done. Those types of tuners can’t recognize all of the notes on a piano. On top of that, tuning a piano isn’t merely tuning each note to perfect A440. You’ll need to understand the concept called pitch stretching for excellent piano tuning, but I’ll get into that later on.
The only downside is the cost. You can spend upwards of $1,000 on a high-quality chromatic tuner. It could set you back a bit, but it could also save you money in the long run.
On average, one piano tuning from a professional tuner costs around $100. Since pianos are ideally tuned twice a year, that’s about $200 a year.
One alternative to a chromatic tuner is a tuning software. These aren’t quite as preferable, but they can still get the job done. Lots of online companies offer software with endless tuning controls. If you go this route, you’ll need an external microphone to plug into your PC. Even with the best software, you might not get good results by using your laptop’s microphone.
Mutes
Mutes are cheap tools that are essential for tuning a piano. They usually cost as little as a few dollars per piece. Since they’re easy to come by, it’s great to add more than one to your arsenal. If you buy at least 6 differently sized mutes, you’ll have a much easier time tuning your piano. Some of them work better with larger strings and others with thinner strings. The two main mute types are rubber mutes and felt strips. Though they serve the same purpose, you might benefit from trying out both to figure out which one you like best.
Feather Duster and Rag
These tools are more convenient than they are necessary. Over time, lots of dust can build-up in a piano. You should remove this dust around the strings and pins before you begin the tuning process. Doing this maintains the piano’s condition, makes it look nicer, and most importantly, makes it easier to tune.
The Tuning Process
When you have all the necessary tools, you can finally begin the process. Before starting, make sure you’re up for the challenge. The first time is always the hardest. If your piano hasn’t been tuned for ages, it will be especially difficult. It might even need a pitch raise. But, for now, I’ll go through the tuning process for a piano that doesn’t need a pitch raise. Afterward, I’ll teach you the pitch-raising process.
Step 1: Tune Middle C
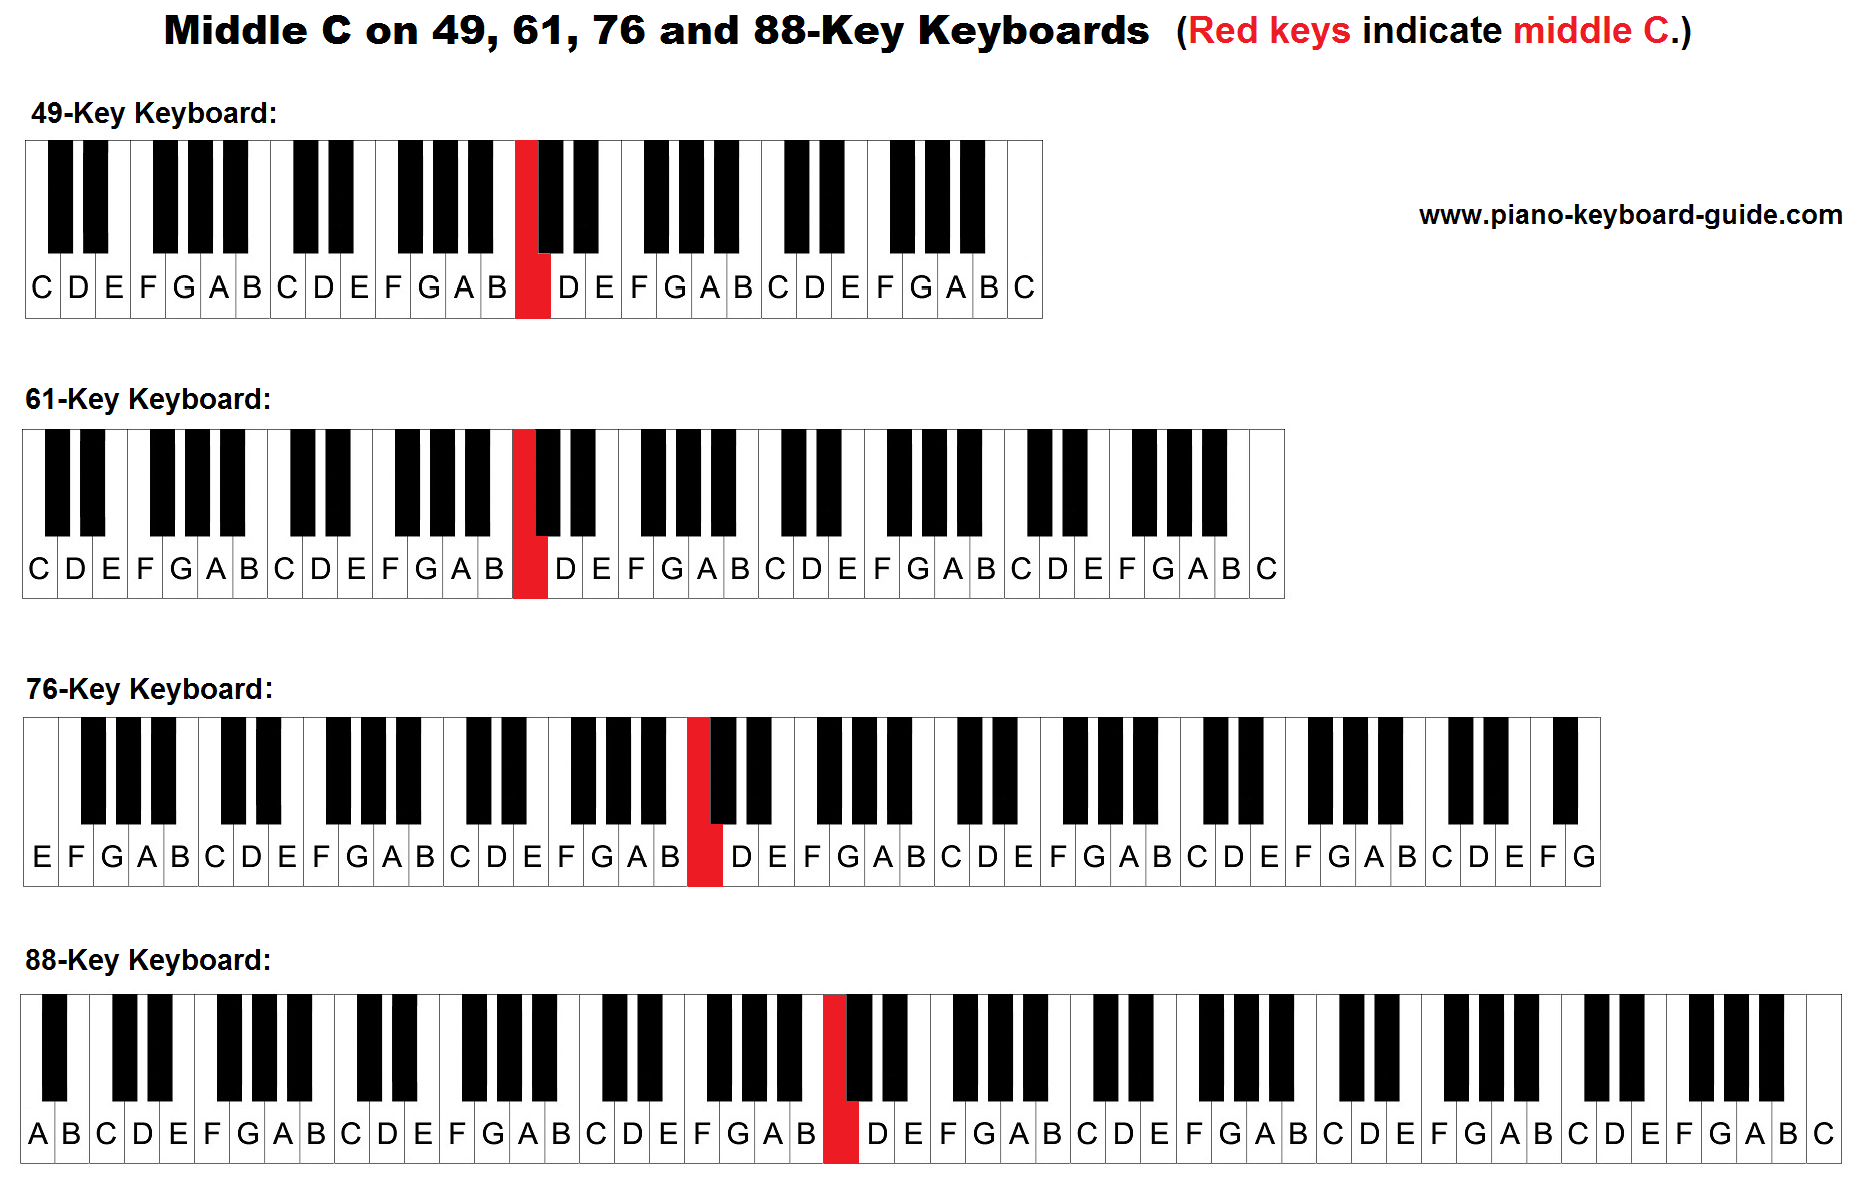
Most pianos have 3 strings for middle C, while some of them only have 2. If there are 3, start with the middle string, and find the pin that turns the middle string. After you’ve found it, place the socket of your tuning hammer over the pin. Before you start twisting and turning, you have to mute the other 2 strings. As you’re placing the mutes, always hold down the sustain pedal. Without holding the sustain pedal, the dampers gently rest on the strings. Inserting a mute can damage the dampers because the strings move slightly. Make sure you insert the mutes gently to avoid damaging the strings.
Once you mute the two outside strings, you can completely focus on the middle string. Twisting the hammer left flattens the string while twisting it right sharpens it. Start out by loosening, or twisting left, the string lightly. Now, strike the C key constantly as you start twisting it to the right. Pay attention to your tuner, and stop twisting once it signals that the key is in tune. If the note is off by a lot, the tuner might think you’re trying to tune to a different note. So, you need to make sure which note you’re tuning beforehand.
Now that you’ve tuned the middle string, it’s time to tune the two outside ones. The goal for these two strings is to perfectly match them with the middle string. Piano tuners call this “tuning the unisons.” Start by removing one of the mutes. You don’t need to mute the middle string. Just make sure the other untuned string is still muted.
You can tune the second string with a chromatic tuner or by ear. If you do it by ear, continuously strike middle C, and twist the tuning pin. The goal is to make it sound like a single tone. If it sounds like 1 tone, that means the string is tuned well. After this, all that’s left is the final string. Take out the remaining mute and begin striking the key once more. If the piano is fairly out of tune, it will sound similar to two separate tones very close to each other. You can use the same by-ear tuning method for this last string. Like always, slightly flatten the string and carefully raise it up until the sound is one.
Repeat this process for every note between C4 and C5. Once you’re done with that, you’ve successfully set the temperament. As you’ll see in the next step, the temperament is the foundation on which you tune the rest of the notes.
Piano Tuning – Touching Up An Out of Tune Unison
Step 2: Comparing The Octaves
Once you’ve set the temperament, you can move on to the next octaves. It doesn’t matter if you start on an octave above or below the temperament. Use the same process of muting, loosening, and matching the strings’ pitches. Match the notes to your temperament tuning. Once you tune a string, tune the unisons the same way as you did in the temperament. Work your way up the octave with the same process. The progression of notes you tune in each octave is your choice.
However, it can speed up the process if you develop a pattern. It’s also excellent to alternate between lower and higher octaves. This technique balances the overall string tension of the piano. If you do one side at a time, the unbalanced string tensions could result in you having to tune several notes again.
How To Pitch Raise a Piano

If a piano is extremely out of tune, it probably needs a pitch raise. There aren’t any shortcuts with this type of procedure. Each note on the piano is tuned a little bit sharp. To start out, tune the temperament F4 to F5. Tune each note precisely 10 cents sharp. When raising the pitch of so many strings, it’s crucial to create enough tension room. As you continue the process, the notes you raised will start falling flat, which is why you tune them sharp initially. It’s important to remember that pitch raising can be a risky endeavor.
Sometimes, piano strings can end up in poor condition if they haven’t been maintained in a long time. A string could break as you’re raising it. However, string breaks usually stay inside the piano, and they aren’t dangerous to people. When you’re raising the lower strings, you don’t need to sharpen them because the more you do, the more chance they will break. Lower strings are wound, which makes them more expensive than the rest.
Once you’ve raised the bass strings, the middle strings will likely be flat again. This slip down is to be expected. Now, you’ll start raising the treble strings to 20 cents sharp of the corresponding lower keys. Once again, make sure you don’t overstretch them and do your best to avoid any breaks. Lots of times, it’s necessary to go over the treble again after you’ve finished. By the time you’re done with the first round, many of the notes will have fallen flat again.
When you’re tuning the treble, it’s great to work in octaves. Instead of tuning up or down note for note, tune all the A’s first, B’s second, etc. This method helps balance the tension of the strings more evenly and effectively keeps them more in-tune. Using this method in the bass notes is also effective. Once you’ve raised every note, you’ve finished the first tuning. However, a sustainable pitch raise often needs more work.
At this point, assess how well each of the strings held up. The piano’s tuning will still be far from sounding good. However, the octaves should be closer together than they were initially. Before you go through another pitch raising procedure, make sure to strike every note several times. Doing this sets the strings and solidifies their current tuning.
Now, you can begin the second tuning. This process involves you tuning all of the notes just a few cents sharp. As you go about this process, you will strike the keys a bit harder than before to set the tuning. They’re in the vicinity of concert pitch, so now it’s time to dial them in a bit more. Use a chromatic progression when tuning these notes. Once you get through all the keys, the piano should be very close to concert pitch.
If you’ve never done a pitch raise before, this process could take anywhere from a few hours to the whole day. It’s a physically demanding procedure, but you can be happy that the hardest part is over.
What is a Pitch Raise? Does Your Piano Need a Pitch Raise
Stretch Tuning
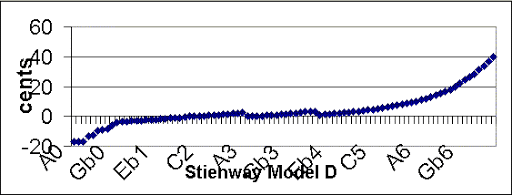
Even if you’ve never heard of stretch tuning, you’ve likely encountered it. Stretch tuning is a common practice that piano tuners use to create a grander, fuller, and more satisfying overall sound. Let’s use the A above middle C, or A440, as an example. The number 440 describes how many vibrations there are per second. This amount of vibrations happens to produce that A. If we double the number of vibrations to 880, we now have the A an octave higher.
If you perfectly tune every note to 440, the higher notes will sound flat. Why is this? As humans, we don’t have perfect pitch perception. We tend to start hearing flat in the high register. So, for us to hear the pitches correctly, the upper notes on a piano need to be slightly sharp. The gradual increase in flatness and sharpness is exponential. You can find online charts that illustrate how flat and sharp you should tune every note for effective stretching.
You can either attempt to do it manually or rely on a tuner or software. High-quality chromatic tuners give you the option to tune directly to the stretch. Some of them even have different stretch presets for different piano models. You may be able to find software that aids with stretch tuning, but it’s up to you to decide if it’s worth it.
Before attempting to do the stretch, it’s best if you have some experience with tuning already. Though nothing is stopping you from attempting it, it’s an even more advanced process than tuning. The major risk factor of stretching is damaging or break strings from overstretching.
What is Stretch Tuning?
How Much Does it Cost To Tune a Piano?
Effectively tuning your piano doesn’t come without a decent investment. First, I’ll talk about the necessary purchases. Some of the things you need, for sure, are a chromatic tuner or tuning software, a tuning hammer, mutes, and rags. These items are the bare minimum. The biggest investment you’ll have to make is the chromatic piano tuner. Good chromatic tuners can cost upwards of $1,000 and higher. You can also find reliable software for your PC.
If you choose this route, you’ll need a good microphone. Though there isn’t a specific microphone that works best for tuning, you might want to get a USB mic. These mics can plug directly into your laptop without an interface. If you get a regular microphone, you’ll need to have an interface, which isn’t necessarily a bad thing, but they can cost $100 to $300 at the minimum.
Tuning hammers are the second biggest investment. However, they are much more affordable, and you can find reliable ones for around $50. When it comes to tuning hammers, you get what you pay for. If you look for the cheapest one, you might not get a good product.
When it comes to mutes, there are countless different kinds. They all have something in common, and that is their low price. Most mutes cost as little as a few dollars apiece. It’s a lot easier to get a balanced variety from a kit rather than buying them separately. There are plenty of excellent kits available on Amazon for under $20.
A tuning fork is an optional item to add to your set. You don’t need one unless you plan to tune the piano by ear. Most people who tune their own pianos won’t use this method because it’s more complex than using a tuner. Tuning a piano by ear requires ear training to recognize each string’s beats and vibrations. 2 notes, especially 10ths, are usually played, and you have to compare the beat differences. If you plan to look into this method, a quality tuning fork can cost under $20.
Why it Might Be Worth it To Tune Your Own Piano
It seems like lots of hard work and investment to tune your piano, so why not simply hire a piano tuner? Though a piano tuner is always a trustworthy path, there are a few reasons why it might be worth it to learn this art form yourself.
Firstly, you’ll be able to tune your piano as much as you want. If you have an older piano or live in a place with profound seasonal changes, your piano might go out-of-tune quicker. Keeping it in tune could take 3 to 4 visits from a piano tuner a year, costing $400 to $500. If that’s the case, you could highly benefit from learning how to tune one. Even if you invested in the finest chromatic tuner on the market, you could still pay it off in a few years.
However, merely paying off the price of the equipment is at the bottom of your potential. If you gain the knowledge and equipment to tune a piano, you can do it for others as well. Piano tuning is an excellent side job that can earn some decent cash. The more pianos you tune, the faster you’ll get. Most piano tuners can get the job done in 30 minutes to an hour. Even if a tuning takes you 2 hours, that’s still $50 an hour. You could possibly pay off the equipment and start earning extra money within a few months.
Circumstances Where Hiring a Piano Tuner Might Be Better
It’s tempting to learn to tune your piano, and embarking on this journey is an excellent choice for many people. However, there are a few circumstances in which hiring a tuner might be more beneficial. The first one is your frequency of tuning. If you don’t play the piano very often or don’t plan to tune much, you might be better off hiring a piano tuner.
They have all the equipment and can get the job done very quickly. If you spend a lot on piano tuning equipment, you won’t make that money back if you don’t tune at least twice a year. Another reason you might hire a piano tuner is time constraints. Learning to tune a piano takes a decent amount of effort, and it might not work out if you don’t have some extra time to dedicate.
Rather than diving straight into it, it’s best to spend several weeks reading articles, watching videos, and consulting other learning resources. Doing this will make the actual challenge much less overwhelming. You’ll have time to make a game plan and find the right equipment. It might take lots of effort on your part, but if you invest time learning how to tune a piano, you’ll save money and can even start making some.

