Table of Contents
- Yamaha EZ-220 Song List
- Yamaha EZ-220 How to Download Songs
- Yamaha EZ-220 How to Connect to iPad
- How to Connect Yamaha EZ-220 to Computer
- How to Use Yamaha EZ-220 as Midi Controller
- How to Create Midi File Using Yamaha EZ-220
- How to Record Yamaha EZ-220 on Computer
- How to Install Songs on Yamaha EZ-220 Keyboard
- How to Change Scale Yamaha EZ-220
- How to Add a Song to the Yamaha EZ-220
- How to Upload Styles to Yamaha EZ-220
- How to Reset Yamaha EZ-220
- How to Set Split Piano on Yamaha EZ-220
- How to Wireless Connect Yamaha EZ-220
- How to Adjust Range on Yamaha EZ-220
- How to Change Octave on Yamaha EZ-220
Yamaha EZ-220 Song List
To see the song list of the Yamaha EZ-220, you may refer to the contents page of the Yamaha EZ-220 song book.
Yamaha EZ-220 How to Download Songs
As the Yamaha EZ-220 does not have any internal memory, it is unable to store songs.
Yamaha EZ-220 How to Connect to iPad

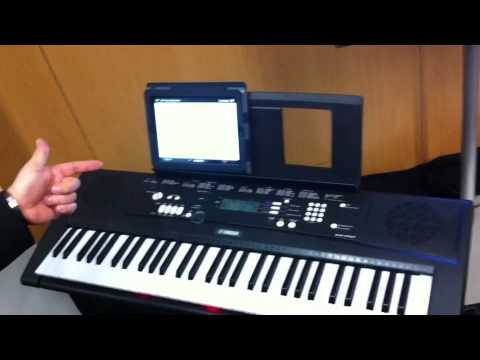
To connect the Yamaha EZ-220 to iPad, you may follow the steps below.
- 1Ensure the EZ-220 Page Turner app is already installed to your iPad.
- 2Place your iPad on the music rest such that the microphone of the iPad is located on your left side. Secure your iPad using the clip provided.
- 3Start the EZ-220 Page Turner app. The Tutorial should be automatically called up.
- 4Follow the instructions given by the Tutorial to confirm that the iPad is properly receiving the Page Turn signals from the keyboard.
How to Connect Yamaha EZ-220 to Computer

To connect the Yamaha EZ-220 to computer, you may follow the steps below.
- 1Turn off the keyboard.
- 2Turn on your computer.
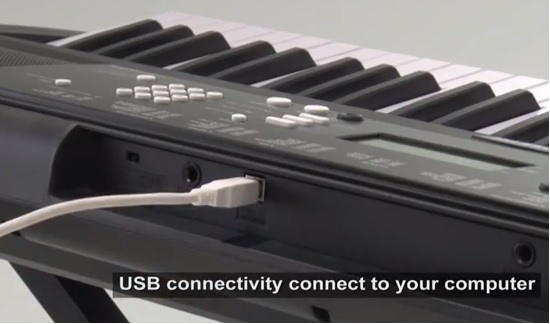
- 3Connect the USB terminal of your computer and the USB TO HOST terminal of the keyboard using an AB type USB cable.
- 4Turn on the keyboard.
How to Use Yamaha EZ-220 as Midi Controller
To use the Yamaha EZ-220 as midi controller, you may follow the steps below.
- 1Connect the Yamaha EZ-220 to your computer via the USB TO HOST terminal on the keyboard using an AB type USB cable.
- 2Install the Yamaha USB-MIDI Driver to your computer. The software can be downloaded here.
- 3Install a midi software to your computer.
- 4Ensure the keyboard is selected as the hardware in the software’s preference.
How to Create Midi File Using Yamaha EZ-220
To create midi files using the Yamaha EZ-220, you may follow the steps below.
- 1Connect the Yamaha EZ-220 to your computer via the USB TO HOST terminal on the keyboard using an AB type USB cable.
- 2Install the Yamaha USB-MIDI Driver to your computer. The software can be downloaded from here.
- 3Install an audio software to your computer.
- 4Ensure the keyboard is selected as the input in the software. To see a demo of creating a midi file using a keyboard, you may refer to this video (watch the video starting at 8:00 to find out how to create a midi file):
How to Record Yamaha EZ-220 on Computer
To record the Yamaha EZ-220 on your computer, you may follow the steps below.
- 1Connect the Yamaha EZ-220 to your computer via the USB TO HOST terminal on the keyboard using an AB type USB cable.
- 2Install the Yamaha USB-MIDI Driver to your computer. The software can be downloaded here.
- 3Install an audio software to your computer.
- 4Ensure the keyboard is selected as the input in the software. To see a demo of recording a keyboard, you may refer to this video (please watch the video starting at 8:00 to find out how to record the keyboard):
How to Install Songs on Yamaha EZ-220 Keyboard
As the Yamaha EZ-220 keyboard does not have any internal memory, it is unable to store songs.
How to Change Scale Yamaha EZ-220
To change the scale (tuning system) of the Yamaha EZ-220 to another scale, you may follow the steps below.
- 1Press the “FUNCTION” button several times until “Tuning” appears on the LCD display.
- 2Use the “+” and “–” buttons to set the Tuning value.
- 3To return to the default of the keyboard, press the “+” and “–” buttons at the same time.
How to Add a Song to the Yamaha EZ-220
As the Yamaha EZ-220 does not have any internal memory, it is unable to store songs.
How to Upload Styles to Yamaha EZ-220
As the Yamaha EZ-220 does not have any internal memory, it is unable to store styles.
How to Reset Yamaha EZ-220
To reset the Yamaha EZ-220, you may follow the steps below.
- 1Turn off the Yamaha EZ-220.
- 2To clear backup parameters, you may hold the rightmost white key while pressing the power button to turn on the keyboard.
How to Set Split Piano on Yamaha EZ-220
To split the Yamaha EZ-220 keyboard, you may follow the steps below.
- 1Select the main voice. To do so,
- Press the “VOICE” button.
- Selected the desired voice using the number buttons or “+” and “–” buttons.
- 2Select a style for the Auto Accompaniment in the left section of the keyboard. To do so,
- Press the “STYLE” button.
- Selected the desired style using the number buttons or “+” and “–” buttons.
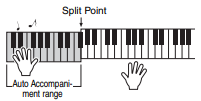
- 3Press the “ACMP ON/OFF” button. This splits the keyboard into the left section (chord) and right section (melody).

- 4Press the “SYNC START” button. You may start playing a chord with your left hand to start the auto accompaniment. Play a melody with your right hand.
- 5Please note that the default Split Point is key number 54 (see image above). To set the Split Point, you may follow the steps below.
- Press the “FUNCTION” button several times until “SplitPnt” appears on the LCD display.
- Use the number buttons to set your desired Split Point.
How to Wireless Connect Yamaha EZ-220
To use the Yamaha EZ-220’s built-in wireless connectivity to the iPad EZ-220 Page Turner app, you may follow the steps below.
- 1Ensure the EZ-220 Page Turner app is already installed to your iPad.
- 2Place your iPad on the music rest such that the microphone of the iPad is located on your left side. Secure your iPad using the clip provided.
- 3Start the EZ-220 Page Turner app on the iPad. The Tutorial should be automatically called up.
- 4Follow the instructions given by the Tutorial to confirm that the iPad is properly receiving the Page Turn signals from the keyboard.
How to Adjust Range on Yamaha EZ-220
As the Yamaha EZ-220 has 61 keys, the range of the tones produced by the keyboard is fixed. However, the overall pitch of the keyboard can be adjusted up or down. To do so, you may follow the steps below.
- 1Press the “FUNCTION” button several times until “Transpos” appears on the LCD display.
- 2Use the number buttons to set a value of between 12 (to adjust the pitch up) or –12 (to adjust the pitch down). Each increment of 1 indicates an increment of 1 semitone.
- 3To return to the default of the keyboard, repeat step 1 and press the “0” button.
How to Change Octave on Yamaha EZ-220
To change overall pitch of the Yamaha EZ-220 up or down by one octave, you may follow the steps below.
- 1Press the “FUNCTION” button several times until “Transpos” appears on the LCD display.
- 2Use the number buttons to set a value of 12 (for one octave up) or –12 (for one octave down).
- 3To return to the default of the keyboard, repeat step 1 and press the “0” button.

